Over a third of us choose to use Gmail for our email management, relying on the platform every single day and yet very few of us know how to effectively organize our Gmail accounts. We all know the importance of an organized Gmail inbox, and yet we don’t always utilize the productivity tools put in place to help us to sort and organize our emails.
12 Ways to Organize Your Gmail Inbox
Do you find that your productivity is hampered every time you get a new email notification? Well, you’re not alone; studies have shown that it takes, on average, 25 minutes to regain focus and return to the ‘peak deep work zone’ after each distraction.
If this sounds like you, you probably need to familiarize yourself with the essential tools and features that the free email service has developed over the last twenty years to help us with just this problem.
In this article, I’m sharing a deep dive into exactly how to organize your emails on Gmail, as well as letting you in on the handy hacks that stop the distractions and turn your Gmail inbox into a fantastic productivity tool instead.
- Format how your Gmail inbox is displayed
- Use labels to sort your Gmail emails
- Create filters to automatically sort your Gmail
- Remove the inbox tabs you don’t use
- Snooze emails for later
- Archive the emails you no longer need
- Learn Gmail’s shortcuts
- Activate undo send
- Use dots in email addresses to decipher the sender
- Use hashtags in your email copy
- Unsubscribe from the marketing emails you don’t need
- Condense your favorite regular newsletters into a regular digest
Continue reading to find out more about each of these Gmail organisation tips.
1. Format how your Gmail inbox is displayed
The way your Gmail inbox is presented whenever you open it will have a huge impact on how it makes you feel. Everyone has their preferences on how they like to see their emails displayed, and how they don’t.
For some people, seeing all their unread emails first enables them to open and action those that need immediate attention. For others, this adds to the potential distraction.
Gmail has five options on how to display your email messages:
- Default
- Important First
- Unread First
- Starred First
- Priority Inbox
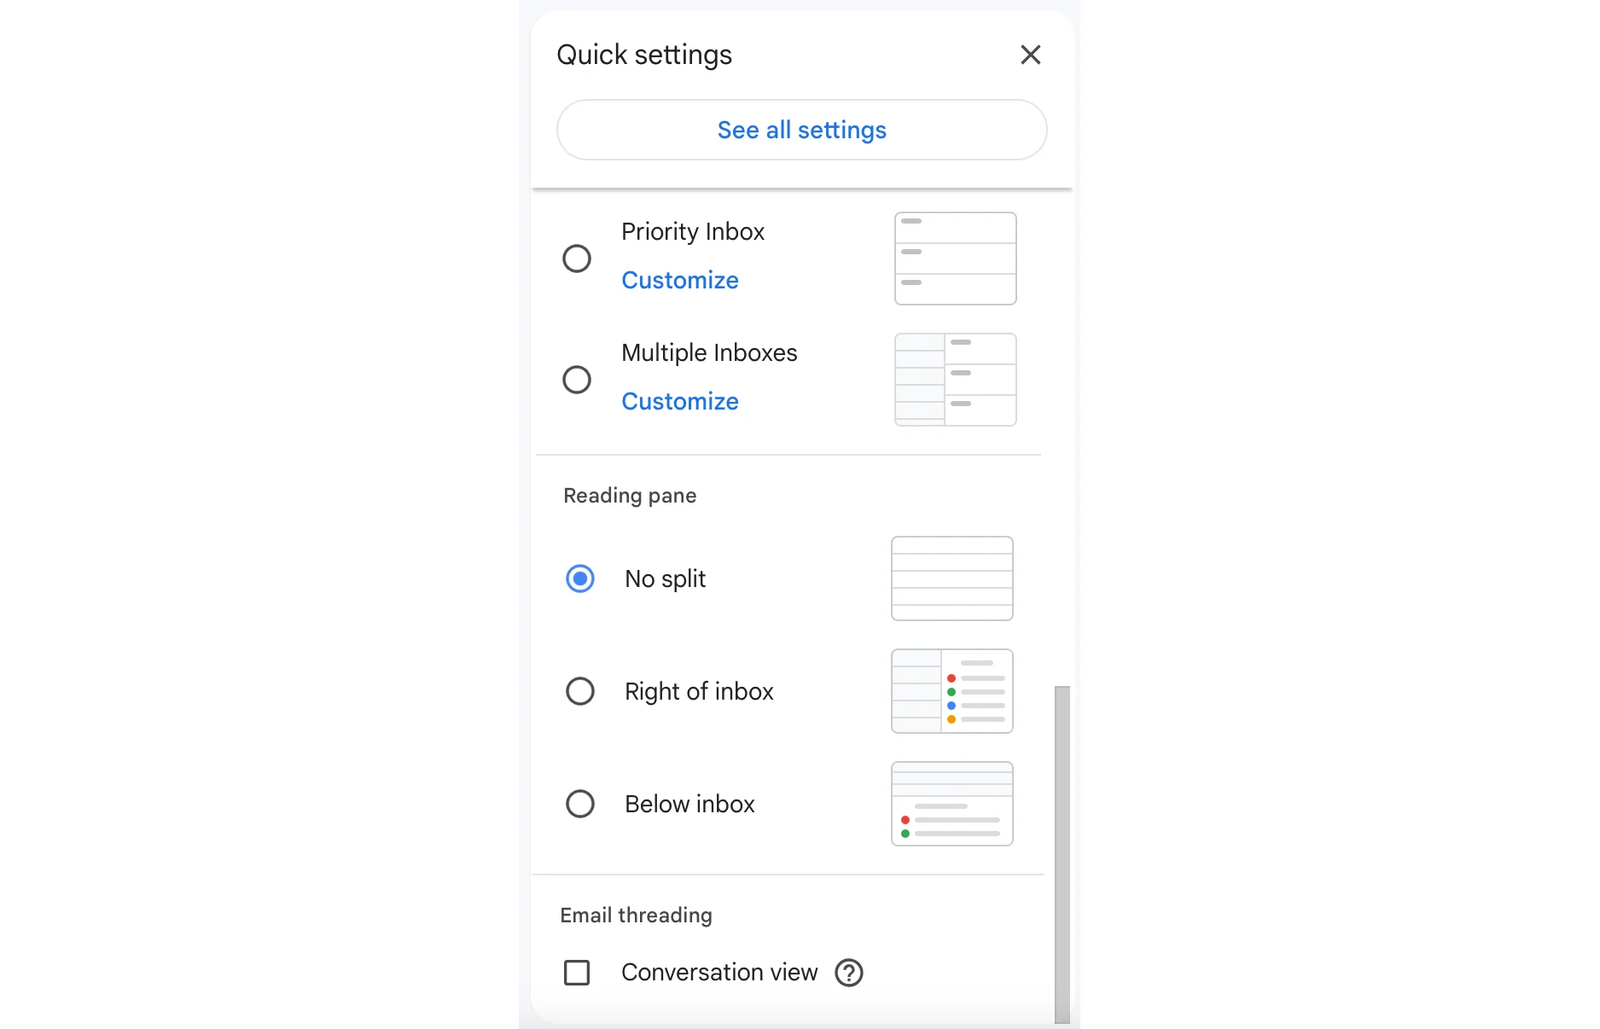
Another recommendation on how to present your Gmail inbox for easy actions is using the ‘reading’ screen. This splits your screen to show your email copy on the right or bottom of the inbox panel, enabling you to quickly skim through your emails to find the information you were looking for.
To turn on the reading pane, go to the ‘Settings’ cog in the top right and scroll down to ‘Reading pane’ and select the format you prefer.
2. Use labels to sort your Gmail emails
Gmail is actually a label-based email management system. All your emails have a label added automatically, for example, ‘inbox’ or ‘trash’ to help sort your Gmail.
We can extend these labels to make them work for us, not just for Gmail, and they’re particularly useful if you’re a visual person as we can color code them too.
You can set up your labels however works for you; for example, you could categorize your emails by Project or Client Name. This kind of labeling acts as a simple form of email segmentation, allowing you to visually and functionally separate different message types for a more organized workflow. The greatest part is you can add multiple labels if the email content overlaps two of your label categories.
To add labels all you need to do is select the email you would like to label and click the ‘Label’ icon in the taskbar; from here, you can select the relevant label or if you need a new one, select ‘Create New’.
The next step to level up your label game would be to automatically assign a label as the email arrives in your inbox, we would do this using filters.
3. Create filters to automatically sort your Gmail
Gmail filters are another great but underused organizational tool they’ve provided for us. You can filter by almost anything: sender, subject, content…the possibilities are endless. Once you’ve created your filter, then you can tell Gmail what you’d like it to do with them - add a label, move it to a folder, archive it, etc.
We can then create automated filtering, so any email that comes into your inbox and meets that criteria will automatically be filtered by Gmail exactly as you’d like.
To do this, use the search bar at the top of the screen. Click on the filters in the corner of the search bar:
From the drop down you can fill out your ‘Filter’ criteria:
Once you’ve completed your requirements, then select ‘Create filter’:
And finally select the action you would like Gmail to fulfil whenever it sees an email enter the inbox that meets these requirements.
4. Remove the tabs you don’t use
When anyone first sets up a Gmail account, their inbox will come automatically with five tabs activated. You don’t have to have all or any of these active if they don’t help you, other than ‘Primary’. You can easily disable those others that you won’t be using.
First, head to the ‘Settings’ cog in the top right corner, and select ‘See All Settings’, from here navigate to the ‘Inbox’ tab. Please note that the tabs are only visible if your inbox is using the ‘Default’ inbox type.
Remember that as soon as the inbox is disabled those emails will be appearing in your primary inbox, so it might not help with your decluttering project unless you have another plan for them like mentioned elsewhere in this article.
5. Snooze emails for later
Gmail’s Snooze feature is one of my favorite of their developments. This enables you to snooze any email that pops up in your inbox in the same way you would snooze an alarm.
It’s great for when you spot an email over the weekend that you need to action but it can wait until Monday. It’s also great for emails that you can’t do anything with right away but need to action eventually. It’s one step closer to your inbox becoming more like that ordered to-do list we all aspire towards.
6. Archive the emails you no longer need
Sometimes we are all guilty of hoarding emails in the same way as those people on TV hoard milk bottles. We don’t actually need to keep them all, but we can’t bear to be rid of them. However, if you’re not deleting those emails because you ‘might need them later’, then the next best thing to do is to use Gmail’s ‘Archive’ feature and archive them.
Archiving an email takes it out of your inbox but keeps it searchable, meaning if you ever do need to come back to them, you can dig them out quickly.
This will clean up what you’re seeing in your inbox to just show the really useful things you need to be seeing.
7. Learn Gmail’s email shortcuts
One part of spending less time on our emails is through making use of the helpful shortcuts Gmail has put in place with the sole purpose of saving time.
First though, you’ll need to turn keyboard shortcuts on. To do this, go to the ‘Settings’ cog in the top right and click see all settings. Under ‘General’ scroll to ‘Keyboard shortcuts’ and make sure ‘Keyboard shortcuts on’ is selected.
Once you’ve saved your changes, you can start using some of the handy hacks I’ve listed below.
As you can imagine, this isn’t the full list. In fact, if you head over to your Gmail inbox and press Shift + ? you can see all Gmail’s shortcuts.
8. Activate undo send
One of the best features in Gmail’s repertoire is their undo send tool. If you find yourself hitting send too early, spot a last-minute spelling mistake, or are the victim of emailing the dreaded unintended recipient, then you will be familiar with the cycle of productivity-killing email anxiety that follows.
Gmail has an ‘Undo send’ feature, which enables you to unsend emails between five and 30 seconds after you’ve hit send.
To activate this feature go to the ‘Settings’ cog in the top right and click see all settings. Under ‘General’ scroll to ‘Undo Send’ and set your ‘Send cancellation period’ to your required time.
9. Use dots in your email address to decipher the sender
Did you know that Gmail does not see dots in its email addresses? In Gmail’s eyes, the following emails are all the same:
In fact, gmail also can’t see plus signs. So in this example, Joe Bloggs could use this to his advantage by signing up to mailing lists with very specific email addresses such as joebloggs+twitter@gmail.com. This also enables him to easily see which mailing list he signed up for sold his data.
Some Gmail users are less sneaky, avoiding the temptation of becoming a data leak detective instead using the hack to organize their account.
By giving out one version of their email to their professional contacts, another to their personal contacts, and another to newsletters, every email will still reach your inbox but you can then apply automatic filters for each email to filter them into the relevant place in your system ready to be viewed together.
10. Use hashtags in your email copy
Another way to filter your Gmail emails is through using unique hashtags that relate to a particular email theme, client, or project. You can include these hashtags in the footer of your email; for example: #rollups or #emailshield.
Later down the line, when you are looking for email threads relating to this project, all you need to do is use the search bar to filter for those particular hashtags and all the relevant emails will appear.
11. Unsubscribe to the marketing emails you don’t need
The most effective way to take back control of your Gmail inbox is to unsubscribe from all the marketing emails that you don’t need to be seeing (or want to be seeing) anymore. You can do this manually as each email comes into your inbox by following the unsubscribe instructions in each email.
Alternatively, you can use Leave Me Alone to clean up your inbox for you. Through the Leave Me Alone platform, you can see all your subscription emails in one list and easily opt out from there. All you have to do is choose the ones that you no longer want to see and the Leave Me Alone team do the rest, cleverly unsubscribing you from them automatically.
12. Condense your favorite regular newsletters into a regular digest
If you enjoy the content of some of the marketing emails you’re subscribed to but find their continual popping into your inbox sporadically distracting, then I have a solution for you.
Leave Me Alone’s ‘Rollups’ feature enables you to collate any chosen emails into a scheduled newsletter which groups all your selected emails to be delivered at once at a time that’s more convenient for you.
For example, all those e-commerce emails from your favorite retail brands can be organized to all be delivered at 1 pm so you can peruse their various marketing messages and promotions during your lunch break.
Find out all about Rollups and how you can start combining your favorite emails into digests and take control back on when you receive them.
Summary
We are all guilty of complaining that our emails take up too much of our working days, but hopefully you now know there are things you can do to help reduce the time they eat up. By applying these simple steps to organize your Gmail inbox better, you’ll be amazed at the improvement you’ll see in your productivity.
If you’re an Outlook user looking for similar advice then check out our guide on how to organize your emails on Outlook.
FAQs
How can I organize my Gmail inbox effectively?
You can organize your Gmail inbox by using filters and labels to categorize your emails, snoozing emails for later, archiving unnecessary messages, and utilizing Gmail’s display settings to prioritize important emails. These strategies will help you maintain a clutter-free inbox and boost productivity.
What are Gmail filters and how do I use them?
Gmail filters allow you to automatically sort incoming emails based on criteria like sender, subject, or keywords. You can set filters to label, archive, or move emails to specific folders, helping you organize your inbox and reduce distractions.
How do Gmail labels help with email organization?
Gmail labels allow you to categorize emails by specific topics, projects, or clients. You can color-code labels for easier identification and apply multiple labels to an email. This feature helps you quickly find and manage emails related to particular themes or tasks.
How can I unsubscribe from unwanted marketing emails in Gmail?
To unsubscribe from unwanted marketing emails in Gmail, you can manually click on the unsubscribe link at the bottom of the email or use tools like Leave Me Alone to unsubscribe from multiple emails at once. This will help reduce clutter in your inbox.
What is the Rollups feature in Gmail, and how does it work?
The Rollups feature, available in Leave Me Alone, allows you to condense regular newsletters and marketing emails into one digest that is delivered at a time of your choosing. This helps you manage promotional emails more efficiently and reduce inbox clutter.