

There is no feeling that matches the day you achieve Inbox Zero - trust us! So, for those email users interested in how to organize email in Outlook, we’ve pulled together an excellent guide to help you achieve an organized and clean Outlook inbox.
One of the three most widely used email providers, Microsoft Outlook is the preferred choice for over 400 million users. Outlook was initially launched as ‘Hotmail’ in 1996 but was snapped up by Bill Gates, who eventually rebranded in 2012 to Outlook. It was easily the most popular email provider until 2015. While it’s no longer the biggest, overtaken by Gmail and Apple, it is still a common choice particularly within the business world due to its easy integration with the suite of other useful Microsoft apps and services.
While Outlook is a hugely popular email platform, chances are that many users are probably not utilizing all of the features provided to help us know how to manage our Outlook emails. A cluttered, unordered mailbox can lead to missing the most important messages, unnecessary distractions and additional admin time - all of which will decrease your productivity.
How to Organize Your Email In Outlook
The average employee spends around four hours each day handling their inbox, receiving a new email every 4 minutes of the working day. Studies have shown that it takes, on average, 25 minutes to regain focus and return to the 'peak deep work zone' after distractions like new emails.
If the elusive goal, like so many, is Inbox Zero, you will never get there if thousands of old emails are still cluttering up your inbox. So let’s create some calm out of the chaos as this article walks you through the most effective Outlook inbox management techniques available.
Create and use Outlook folders
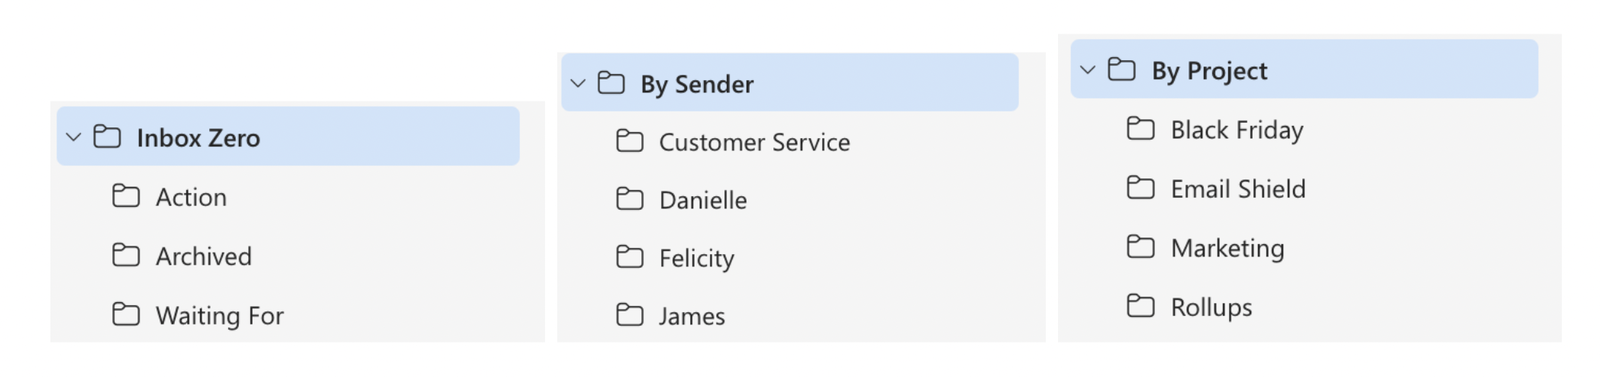
Thinking back to the old-fashioned filing systems you see in '80s movies, this is what your Outlook folders are a virtual representation of. They will be totally different for every user depending on how you use your email. Outlook comes with a small selection of default folders (inbox, sent items, draft, deleted items, and outbox). We recommend creating your own filing system based on your needs. Here are three examples of popular folder structures you could replicate:
- Inbox Zero method
- Categorized by project
- Categorized by sender
How to create folders in Outlook
Please note, depending on whether you use the mobile app, Outlook 365 or the desktop version the process might vary slightly:
- Launch the email app
- At the top of the screen select the Folder tab and click New Folder
- In the pop-up window, rename your folder appropriately and select the purpose of the folder (we recommend Mail and Post Items)
- Next, select where to place your folder and click OK
To move messages into a created folder, it’s simply a case of clicking and dragging. To move multiple email messages select them all by holding down shift and dragging across.
A word of warning: Remember that when you come to delete that folder, all the emails inside it will also be deleted.
Six ways to organize emails in Outlook
Organize your tasks with Microsoft To Do
Do you use your inbox to inform your to-do list, do you take it a step further and your inbox becomes your todo list? If so, stop that right now. If you’re lucky enough to be using Outlook, you’ll also have access to Microsoft To Do, which seamlessly integrates with your email in Outlook.
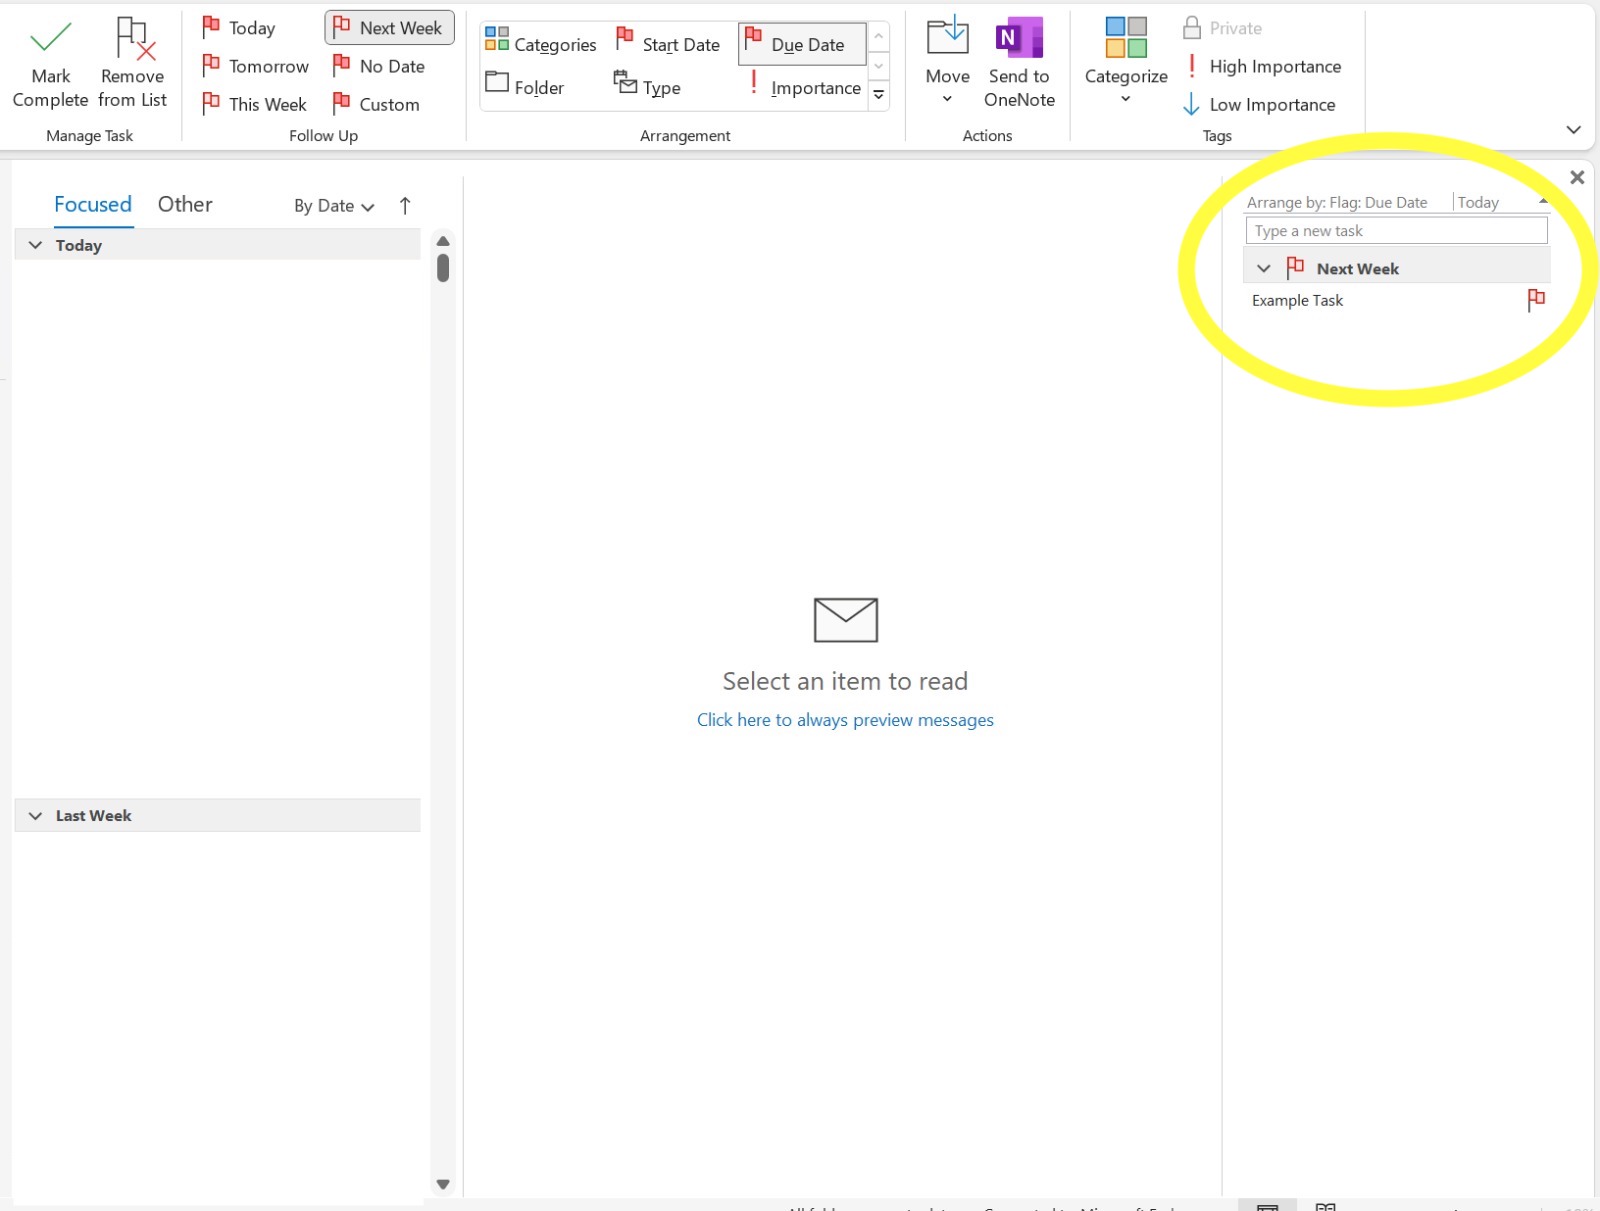
Here’s how to add your emails to Microsoft To Do to create your task list in Microsoft 365:
- From the Outlook toolbar, select the My Day icon which looks like a calendar and a tick. Then the To Do pane will automatically appear.
- Drag the email that you need to add to your To Do list to the To Do pane and drop it in the ‘Add as a task’ section. The subject line will appear as the task name but you can edit that easily by clicking on the name.
- Within this you can customize the task further, including setting reminders and setting due dates, as well as flagging a task as ‘important’ using the star icon on the side of the list.
- Once the task is complete, simply check it off by clicking the ‘Mark as Completed’ icon.
2. Use Outlook’s Categorization feature
Outlook’s categories are a way to visually Organize your Outlook inbox so as to help you scan quickly for a certain type of emails. You can assign a color-coded system with a label to specific emails to set them apart for a particular action. These work in a similar way to labels in Gmail.
The options on how you can use categories are endless, but the purpose is to help you improve your productivity and better organize emails in Outlook. We recommend playing around with the different categorisation options until you find the system that works best for you.

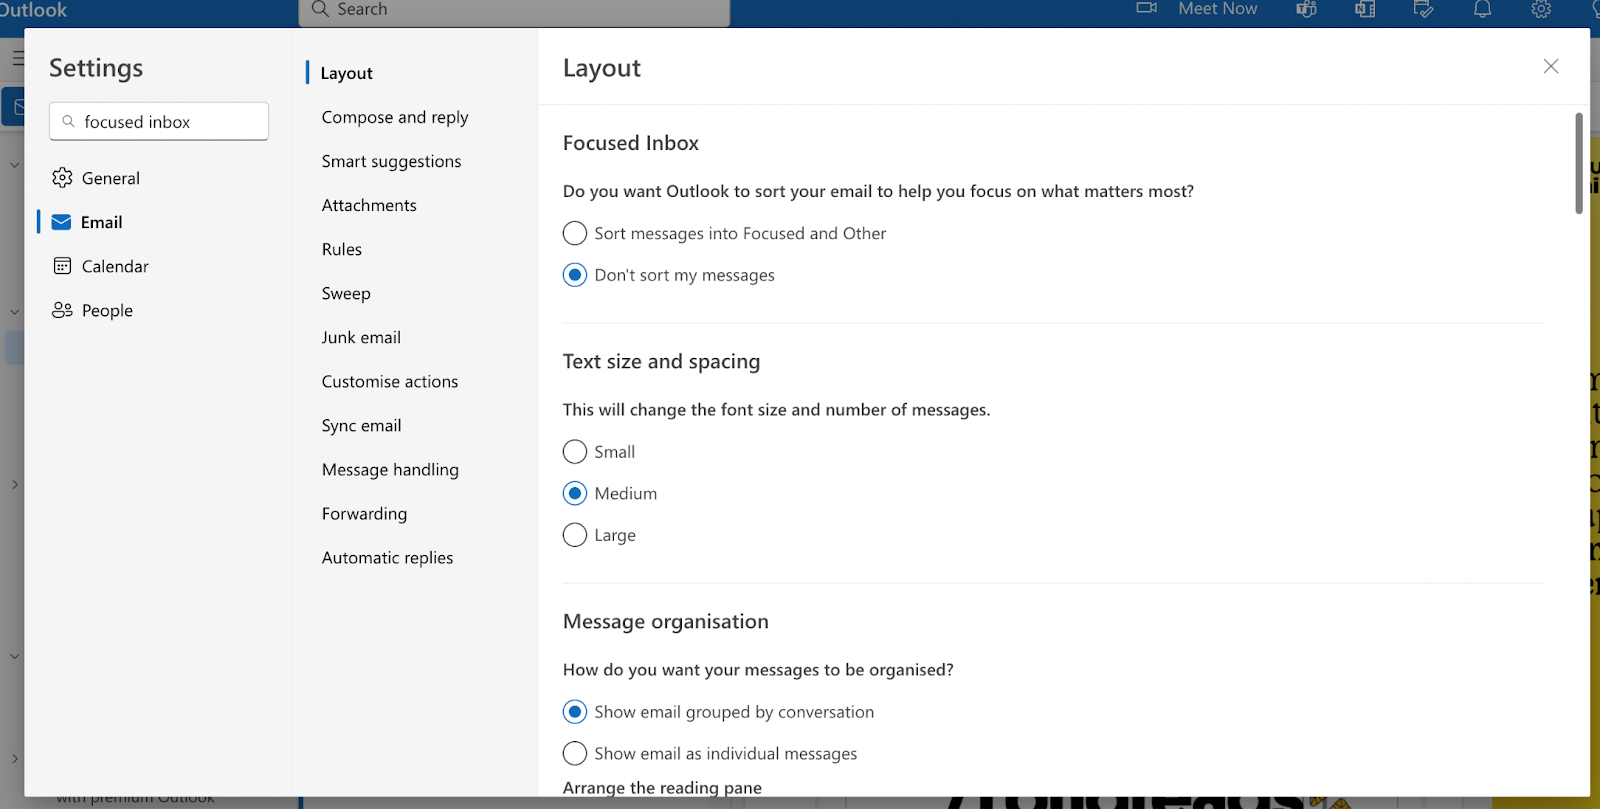
3. Test out the Focused Inbox Feature
There are lots of emails that manage to slip through your filing systems and that don’t require an immediate response, or any response! Outlook offers the ‘Focused Inbox’ mode which enables you to push bulk emails to the ‘other’ folder so that you can concentrate on the most important messages. It uses an algorithm to identify emails that are important and is able to sort out the automatically generated messages or spam.
To activate this feature, go to ‘Settings,’ choose ‘Display Settings,’ and then ‘Focused Inbox’. Or head to settings and simply search for ‘Focused Inbox’. If an email slips the net and you don’t want to see it in your focused inbox, simply right-click and choose ‘Move to Non-Focused.’
4. Archive and delete old messages
If you’re up for a real cleanse, there’s nothing more satisfying than clearing out all the old messages. With Outlook, you have two options on how to do this. The first option is to delete them, this means they are gone forever. The alternative is you can archive messages, this sends the message to an ‘Archive’ folder and is great if you feel you may need that message at some point down the line.
How to archive emails in Outlook:
- Select the message you wish to archive and click the archive button from the drop down ribbon
- If you are yet to create an archive folder, you will be asked to create one before the message is sent to ‘Archive’
5. Try Outlook’s conversation view
This seems to divide audiences. Some people love Conversation view and the ability it gives you to quickly declutter your inbox. Others find it difficult to manage. For the purposes of those looking to organize their inbox though it’s incredibly helpful.
How to turn on conversation view in Outlook:
- Select ‘View’ in the menu bar at the top of the screen
- Check the box for ‘Show as conversations’
- From here you can tailor how the conversation view presents itself, if you need additional support we recommend Microsoft’s conversation view guide.
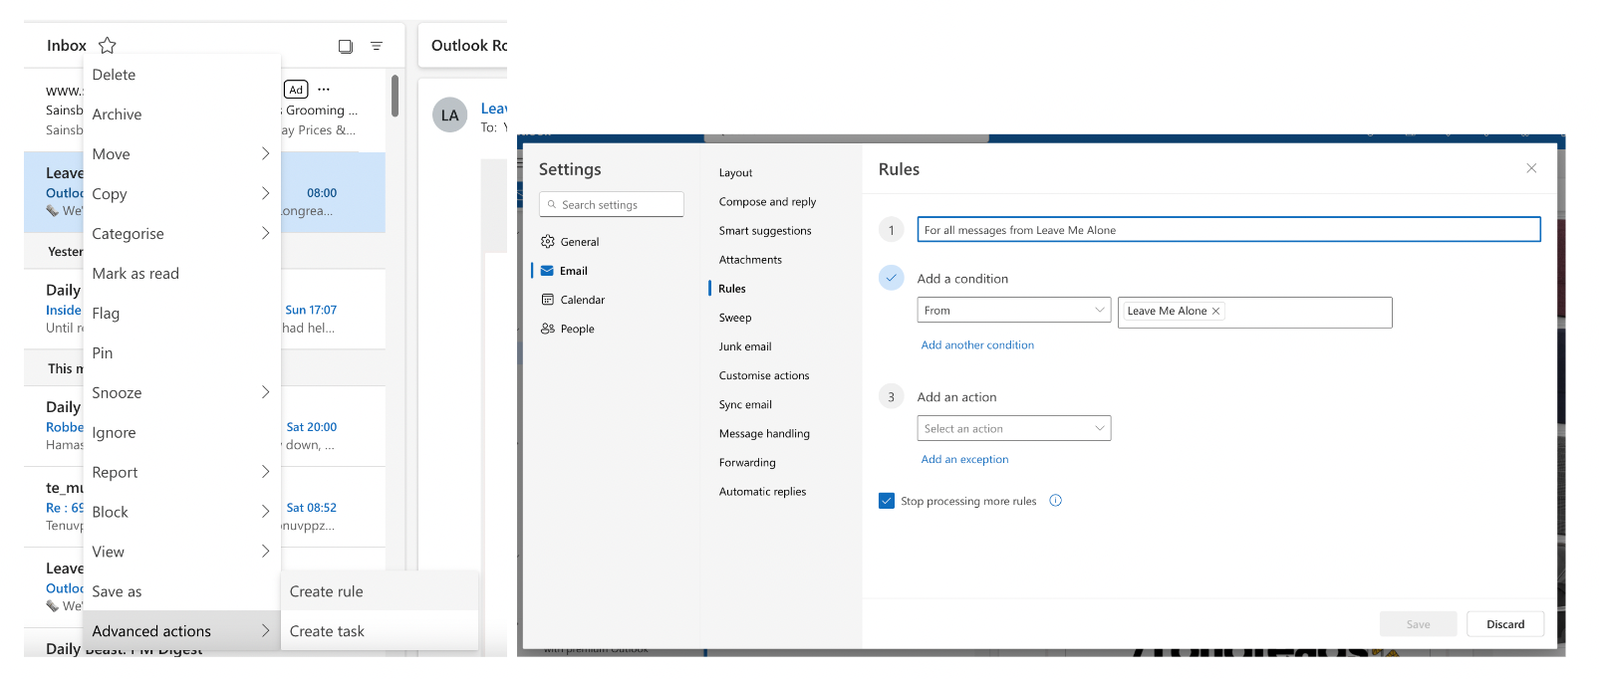
6. Create rules to automatically sort emails
We always say, the more you can automate, the more productive your inbox can be for you. This is where Outlook rules come into their own. You can create customized rules in Outlook to automatically sort your incoming mail into the appropriate folder - you know, those ones we created earlier.
Here’s how to create a rule:
- Right-click on the email and select ‘Advanced actions’ then ‘Create rule’
- Outlook will automatically prompt you to create a rule that moves emails from the sender to a specific folder. To customize exactly what you’d like from the rule click ‘More Options’ in the ‘Create a rule’ window.
- Here are your options on how you can customize your email rule:
- Name your rule - an obvious one, but with a clear name you’ll understand the rule and what it does in the days to come when you’ve set up a lot of them
- Add a condition - This is the criteria that an incoming email has to meet so as to trigger the rule. That could be a particular sender, or a keyword in a particular part of the email. You can also add exceptions to this, to exclude certain emails from automatically being sorted.
- Add an action - Tell Outlook what you want it to do with any emails that meet your set conditions. The three main actions are Organize, Mark Message or Route.
- Once you’re ready, simply check the box ‘Run rule now’ and click save.
Simple Hacks to Organize Your Outlook
1. Unsubscribe from the marketing emails you do not need
The most effective way to take back control of your Outlook inbox is to unsubscribe from all the marketing emails that you don’t need or want interrupting you constantly. You can do this manually as each email comes into your inbox by following the unsubscribe instructions in each email.
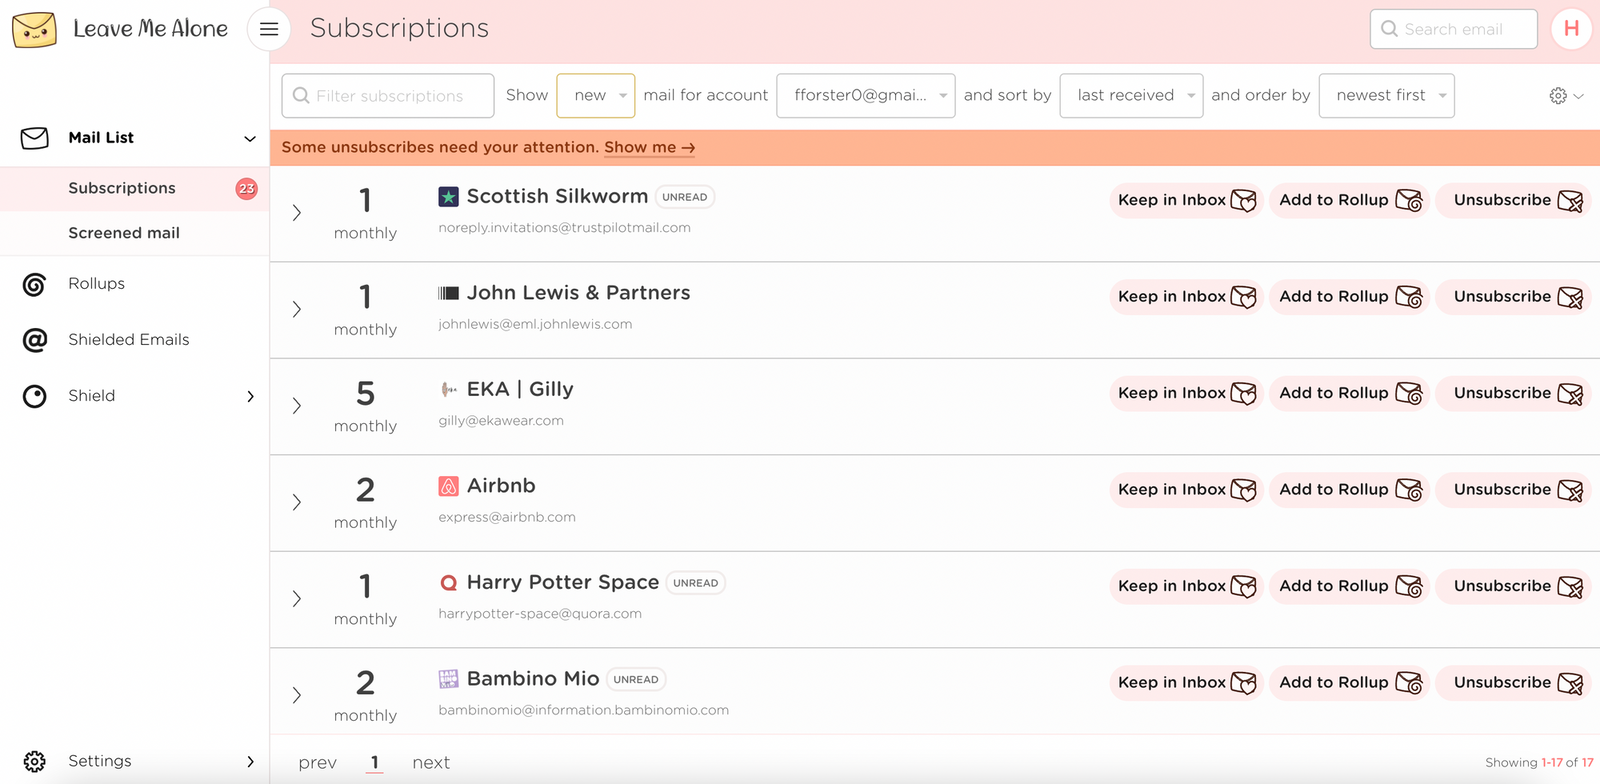
Alternatively, you can use Leave Me Alone to clean up your inbox. Through the Leave Me Alone platform, you can see all your subscription emails in one list and easily opt out from there. All you have to do is choose the ones that you no longer want to see and the Leave Me Alone team do the rest for you, cleverly unsubscribing you from them automatically.
2. Condense your favorite regular newsletters into a regular digest
If you enjoy the content of some of the marketing emails you’re subscribed to but find their sporadic, scattered arrival into your Outlook inbox disruptive to your workflow, then you’re exactly the reason Leave Me Alone launched ‘Rollups’.
Leave Me Alone’s ‘Rollups’ feature enables you to collate any chosen emails into a scheduled newsletter which groups all your selected emails to be delivered at once at a time that is more convenient for you.

For example, all those industry updates from industry specialists can be organized to all be delivered at 8 am so you can peruse their insights over a coffee or during your morning commute to work.
Find out all about Rollups and how you can start combining your favorite emails into digests and take control back on when you receive them.
Summary
We all know that Outlook is a great communication tool, but it doesn’t have to be a sap on your productivity. In fact, it can be an amazing productivity tool. With these simple tricks on how to organize emails in Outlook, you will quickly cut down the time you’re spending on Outlook every day, focusing your time on your most important tasks. And don’t forget to check out Leave Me Alone's services to really nail your email management.
If you’re a Gmail user looking for similar advice then check out our guide on how to organize your emails on Gmail.
