Is someone filling up your inbox with spam or irrelevant emails? Receiving dozens of junk or unwanted emails from unknown senders can be overwhelming.
Most email providers such as Gmail and Outlook have built-in spam detection to filter out junk for you, but they are never 100% successful.The good news is that you can block specific email senders directly if you want to stop receive their annoying emails.
If you are a Microsoft 365 user, in this article we will explain how to block emails and email addresses in Outlook.
We'll go over each of the options you have:
- How to block emails on Outlook desktop app and on the web.
- How to block emails on Outlook on iPhone and Android.
- How to save time using third-party apps like Leave Me Alone.
Let’s get started!
How to permanently block emails on Outlook
Let’s first find out how to clean up your inbox in the Outlook app and on the web. There are multiple ways to do it:
1. Block email address & domain
If you receive a lot of unwanted emails from one sender or company over and over again, Outlook allows you to block them. Here is how to do it:
Outlook desktop app
To block a sender in the Outlook desktop application, take the following steps:
- Open Outlook on your computer and log in.
- Open your inbox.
- Right-click on the email and select Junk in the drop-down menu.
- Select Block Sender in the sub-menu.
5. Confirm your decision in the pop-up window by clicking the OK button.
That’s it! The sender will no longer be able to send you emails.
Here’s how to block an email domain in Outlook on the desktop app:
- Select Settings and click on View all Outlook settings.
- Choose Mail, then Junk Email.
- Enter the domain name in the Blocked Domains field and press the Add button.
- Select Save.
Outlook on the web
To block the sender in Outlook on the web (in any browser), take the following actions:
- Open an email from the sender you'd like to block.
- Click on the "Junk" button in the upper menu.
- Select Block Sender in the sub-menu that appears.
- Confirm your decision in a pop-up window by clicking OK.
2. Mark an email as junk
You can mark spam email as junk in Outlook and it will be moved automatically to the Junk email folder.
Please keep in mind: Junk mail is automatically deleted between 10 and 30 days.
Outlook desktop app
- Open Outlook on your computer and log in.
- Click on the email you want to mark as junk.
- Right-click on the email message and hover your mouse over Junk Mail.Click on Mark as Junk in the sub-menu that appears.
If you want to Outlook to block junk emails better, you can set a rule for your Junk mail.
- Hover on the Home view on the upper menu and click Junk.
- Select Junk E-mail Options… in the sub-menu that appears.
3. Select the option you want to apply depending on how strict you want Outlook to be (see below).
Outlook on the web
To mark an email as junk in Outlook on the web version (in any browser), take the following actions:
- Head over to outlook.live.com and log in to your account.
- Open the email you want to mark as junk.
- Click on the Junk button in the upper menu.
- Select Junk in the sub-menu that appears.
That’s it. The message will be redirected to the Junk Email folder.
3. Report phishing
Phishing emails may ask for personal information such as passwords, bank account numbers, and other sensitive information. When you report suspicious emails, Microsoft will take more serious action regarding the sender. Microsoft also uses these submissions to improve the effectiveness of their email protection technologies.
Outlook desktop app
You can report suspicious emails in the Outlook app by following these steps:
- Open Outlook on your computer and log in.
- Click on the message you want to mark as junk.
- Click on the Report phishing button in the upper menu.
Outlook on the web
To report a suspicious email to Microsoft in Outlook on the web ( in any browser), take the following actions:
- Head to outlook.live.com and log in to your email account.
- Open the email you want to report as phishing and click on the Junk button in the upper menu.
- Select Report phishing in the sub-menu that appears.
4. Confirm your decision in a pop-up window and click the Report button.
4. Archive messages
Archive is a one-click option to remove an email from the inbox without deleting it. If you don't want to delete it permanently but don't want to keep messages visible in your inbox, this option might help you.
Once you archive a message it will be moved into the Archive folder, stopping it from clogging up your inbox.
Outlook desktop app
To archive an email in the Outlook desktop application, take the following steps:
- Open Outlook on your computer and log in.
- Select the File button at the top and click Cleanup Tools.
- From the Cleanup Tools menu, select Archive.
- Choose the folders and email addresses you want to archive. To change the folder, click Browse. Once you've made all of your choices, click OK.
5. Click on Archives in the navigation menu to access your Archives.
Outlook on the web
Take the following steps to archive an email in Outlook on the web:
- Open an email you want to archive.
- Click Archive in the top menu bar.
5. Automatically move emails in Outlook
One of the options to clean up and organize your inbox is to set up rules in the Outlook to automatically move, flag, and respond to email messages. A mailbox rule in Outlook applies various actions to emails that match a specified set of criteria.
We will take you through the process of creating folders with rule actions within your Outlook inbox.
Outlook desktop app
To set a rule for an email or specific sender in the Outlook desktop application, take the following steps:
- Open Outlook on your computer and log in.
- Highlight the email (right-click on it).
- Go to the upper ribbon within the Home view and click on Rules.
4. Select Always Move Messages From [Sender].
5. Choose the folder where you want to move those emails.
A quick tip: you can create a new folder or choose an existing one (Deleted items, Archived items, etc.).
After you create a rule, Outlook will automatically move specified emails from your inbox to the folder that you’ve chosen.
Outlook on the web
In the web version of Outlook, there is a simpler way to create rules for messages. All you need to do is to use Sweep button and then select the required action.
How to block emails in Outlook on iPhone and Android
If you often use Outlook app on your mobile, there are a couple of ways to clean up your inbox.
1. Flag an email as junk or phishing
To mark an email as junk or phishing in Outlook on mobile, take the following steps:
- Open the app on your phone.
- Open your inbox.
- Open an email that you want to mark as junk.
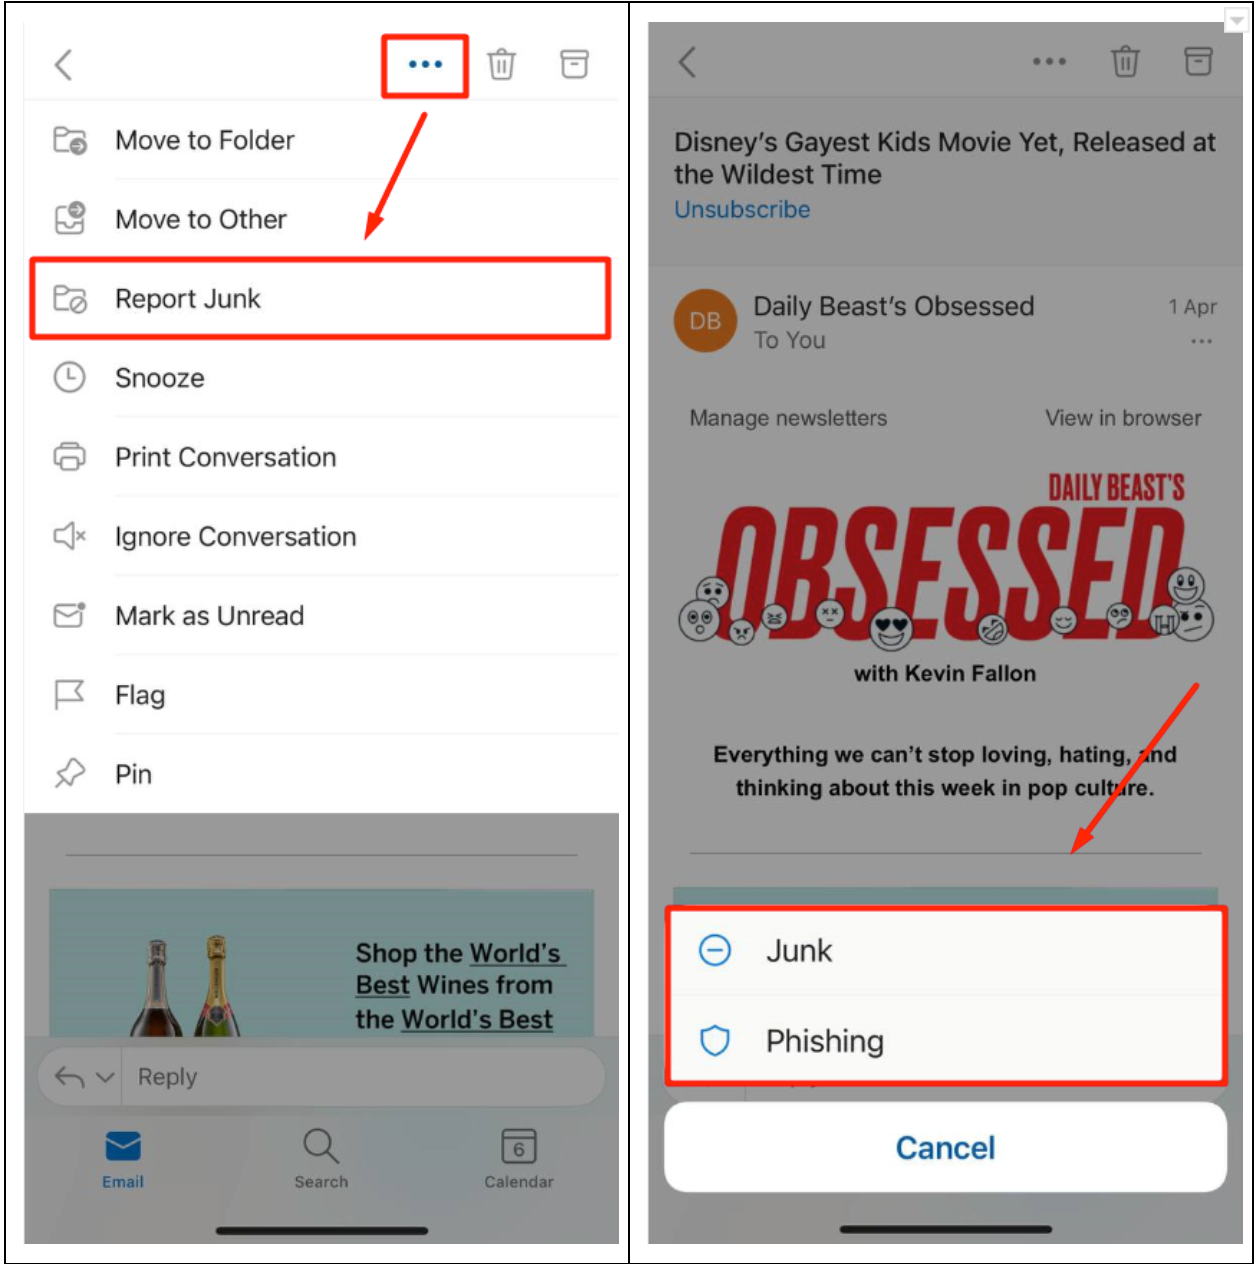
- Click on menu (that looks like three horizontal dots) and click Report Junk.
- Select Junk or Phishing.

6. Confirm your decision in a popup and click Report.
That’s it! The email will be transferred to a Deleted or Junk folder.
2. Block a sender in Outlook on mobile
Unfortunately, the Outlook mobile app does not provide access to block senders. If you wish to block the sender, try to use the desktop or web version as we described above.
How to block emails in Outlook using third-party apps
Third-party services provide another way to solve the problem of removing unwanted emails. The Leave Me Alone app helps you clean up your inbox by displaying all of your newsletter subscriptions at once and allowing you to unsubscribe from them with a single click. There’s no need to open the message, follow the link, or visit the company website.
To clean your inbox with Leave Me Alone, follow these instructions:
- Visit the website and sign up.
- Enter your Outlook email address and click Next.
- Click Sign in with Microsoft.
In the pop-up window, choose your Microsoft account and enter your password.
4. Connect your Outlook email account
The app will let you see the list of all newsletters you are subscribed to.
5. Click Unsubscribe for the ones you no longer wish to receive.
That’s it! The app will unsubscribe you from this sender, and even if you stop using the Leave Me Alone service, you won't get an email from the sender you removed.
Quick notes:
You can also use sorting filters to better see the senders that are clogging your inbox.
You can also connect accounts from other email clients such as Gmail, Yahoo, AOL, iCloud, and many more. There is no limit to the number of email accounts you can connect to.
Conclusion
We hope that after reading this guide, you’re able to easily block unwanted emails on Outlook and finally enjoy an uncluttered inbox. If you loved that and want to scale it over your other email accounts we have guides for how to block emails in Gmail or iCloud too.
To save yourself valuable time manually blocking each contact one-by-one, use Leave Me Alone and clean up your inbox in an instant. You’ll see all of the email lists you’re on in one place and be able to unsubscribe from the ones you don’t want.
Start unsubscribing from emails for free.
FAQs
What’s the difference between “Block Sender” and “Mark as Junk” in Outlook?
Block Sender” puts that specific email address (or domain, if configured) on your blocked‑senders list, so future messages from them go automatically to Junk or are deleted. Marking an email as Junk simply moves that message to Junk folder now — it helps train Outlook’s spam filters, but doesn’t necessarily block all future messages from that sender unless you also block them.
Can Outlook block all emails from a domain — not just a single address?
Yes. In Outlook’s Junk Email settings (desktop or web), you can add a whole domain (like @spamdomain.com) to the “Blocked Domains” or “Blocked Senders and Domains” list. That way, any email coming from that domain will be blocked automatically.
If I block someone, will existing emails from them disappear too?
No — blocking prevents future emails from that sender or domain from arriving in your inbox. Existing messages remain unless you manually delete them.
Can I unblock a sender later if I change my mind?
Yes. In Outlook settings you can go to Junk → Junk Email Options → Blocked Senders (or Blocked Domains) list and remove their address or domain. After that, their emails will once again reach your inbox (unless filtered otherwise).
Is blocking senders enough to stop spam, or should I also use filters/rules and report phishing?
Blocking helps, but spammers often change addresses or domains — so blocking alone may not catch everything. It’s better to combine blocking with stricter Junk‑mail settings, use rules/filters to auto‑delete or move suspicious emails, and report phishing mails to improve detection.
